Not every successful game has to be about shooting aliens or saving the world. The history of board games, and chess in particular, goes back thousands of years. Not only are they fun to play, the idea of porting a board game from the real world to a video game is fascinating.
In this tutorial we’ll create a 3D chess game on Unity. In the process, you’ll learn. how to implement the following:
- How to select a moveable piece
- How to define allowed moves
- How to change players
- How to recognize a winning state
By the end of this tutorial, we will have created a multifunctional chess game that you can use as the basis for developing other board games.
Note: you need to know Unity and the C# language. If you want to improve your skill in C#, you can start with the Beginning C# with Unity Screencast video course series.
Getting Started
Download the project materials for this tutorial. To get started, open a project preset in Unity.
Chess is often implemented as a simple 2D game. In our 3D version, however, we will simulate a player sitting at a table and playing with his friend. Besides, 3D is cool.
Open the Main scene from the Scenes folder. You will see a Board object, which is a game board, and an object for the GameManager. You already have scripts attached to these objects.
- Prefabs: it contains the board, the individual pieces, and the indicator squares to highlight the squares we will use in the move selection.
- Materials: this contains the materials for the chessboard, the pieces, and the squares.
- Scripts: contains components that are already attached to objects in the hierarchy.
- Board: controls the visual representation of the pieces. This component is also responsible for selecting individual shapes.
- Geometry.cs: an auxiliary class that controls conversions between row/column and Vector3 point records.
- Player.cs: controls the player’s shapes, as well as the shapes taken by the player. Also contains the direction of movement of pieces for which the direction is important, such as pawns.
- Piece.cs: a base class defining enumerations for all piece instances. Also contains the logic for defining allowable moves in the game.
- GameManager.cs: stores game logic, such as allowable moves, the initial location of pieces at the start of the game, and other things. It’s a singleton, so it’s convenient for other classes to call it.
GameManager contains a 2D array called pieces that stores the positions of pieces on the board. Explore AddPiece, PieceAtGrid, and GridForPiece to see how it works.
Enable Play mode to look at the board and see the pieces ready to play.
Moving Shapes
The first thing we need to determine is which piece to move.
You can use raycasting to determine which square the player has the mouse on. If you don’t know how raycasting works in Unity, read our tutorial Introduction to Unity Scripting or our popular tutorial about Bomberman.
After the player selects a piece, we have to generate valid squares that the piece can move to. Then we need to select one of them. We will add two new scripts to handle this functionality. TileSelector will help you select the figure to move, and MoveSelector will allow you to pick a place to move.
Both components have the same basic methods:
- Start: for initial setup.
- EnterState: performs the setup for the current figure activation.
- Update: performs ray tracing as the mouse moves.
- ExitState: resets the current state and calls the EnterState of the next state.
This is the simplest implementation of the finite automata pattern. If you need more states, you can make it more formal. However, this will add complexity.
Selecting a cell.
Select the Board in the hierarchy. Then click the Add Component button in the Inspector window. Enter TileSelector in the box and click New Script. Finally, click Create and Add to attach the script.
Note: When creating new scripts, take the time to move them to the appropriate folder to keep the Assets folder in order.
Selecting a selected cell
Double-click TileSelector.cs to open it, and add the following variables inside the class definition:

These variables store a transparent overlay pointing to the cell under the mouse cursor. The prefab is assigned in edit mode and the component tracks the selection and moves with it.
Next let’s add the following lines to Start:

Start takes the original row and column for the selected cell, turns them into a point and creates a game object from the prefab. This object is initially deactivated, so it won’t be visible until needed.
Note: it is useful to refer to row and column coordinates that take the form of a Vector2Int, which we refer to as a GridPoint. Vector2Int has two integer values: x and y. When we need to place an object in the scene, we need a Vector3 point. Vector3 has three floating point values: x, y and z.
Geometry.cs are helper methods for the following transformations:
- GridPoint(int col, int row): gives us the GridPoint for a given column and row.
- PointFromGrid(Vector2Int gridPoint): converts a GridPoint to a real Vector3 scene point.
- GridFromPoint(Vector3 point): gives us the GridPoint for the x and z values of this 3D point, and the y value is ignored.
Next we add EnterState:

This allows you to re-enable the component when it’s time to select another shape.
Next, we add the following to Update:
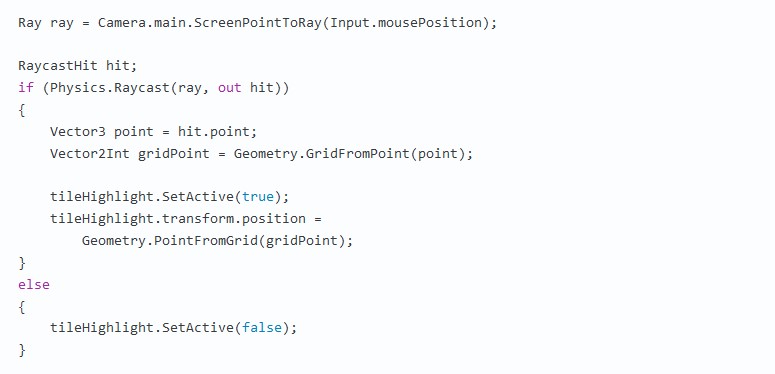
Here we create a Ray ray from the camera, passing through the mouse pointer and on to infinity.
Physics.Raycast checks if this ray intersects with any physical colliders of the system. Since the board is the only collider object, we don’t have to worry about pieces overlapping each other.
If a beam crosses the collider, the RaycastHit records the details, including the point of intersection. Using the helper method, we turn this intersection point into a GridPoint, and then use this method to set the position of the selected cell.
Since the mouse pointer is over the board, we also include the highlighted cell so that it is displayed.
Finally, select in the Board hierarchy and click on Prefabs in the Project window. Then drag the Selection-Yellow prefab into the Tile Highlight Prefab slot of the Tile Selector component of the board.
Now if you run Play mode, you will see a yellow selection cell that follows the mouse pointer.
Selecting a shape
To select a shape, we need to check if the mouse button is pressed. Let’s add this check to the if block, right after the place where we enable cell selection:
If the mouse button is pressed, the GameManager passes us the piece in the current position. We need to check if this piece belongs to the current player, because players shouldn’t be able to move enemy pieces.
Note: in complex games like this, it’s useful to clearly define the responsibilities of the components. The Board only deals with the display and selection of pieces. The GameManager keeps track of the GridPoint values of piece positions. It also contains helper methods that answer questions about where the pieces are and which player they belong to.
Start Play mode and select a shape.
After selecting a figure, we have to learn how to move it to a new cell.
Selecting a moving point
At this point, TileSelector has done all of its work. Now it is time for another component: MoveSelector.
This component is similar to TileSelector. As before, select the Board object in the hierarchy, add a new component to it, and name it MoveSelector.
Transferring Control
The first thing we need to accomplish is to learn how to transfer control from the TileSelector to the MoveSelector component. You can use ExitState to do this. Add the following method to TileSelector.cs:
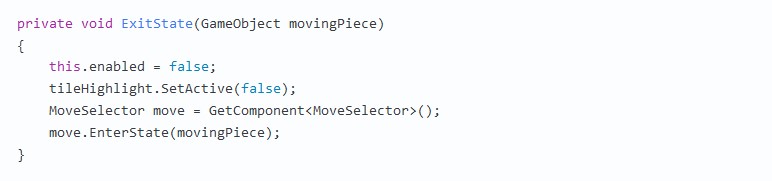
It hides the cell overlay and disables the TileSelector component. In Unity, you can’t call the Update method of disabled components. Since we want to call the Update method of the new component now, it won’t bother us by disabling the old component.
Let’s call this method by adding the following line to Update right after Reference Point 1:

Now open MoveSelector and add these instance variables to the top of the class:

They contain the mouse selection, the cell overlays for moving and attacking, and an instance of the selection cell and the shape selected in the previous step.
Then let’s add the following setup code to Start:

This component must initially be in a disabled state, because we need to execute TileSelector first. Then we load the selection overlay the same way we did before.
Moving the shape.
Then we add the EnterState method:

When this method is called, it saves the moved shape and includes itself.
Let’s add the following lines to the Update method of the MoveSelector component:
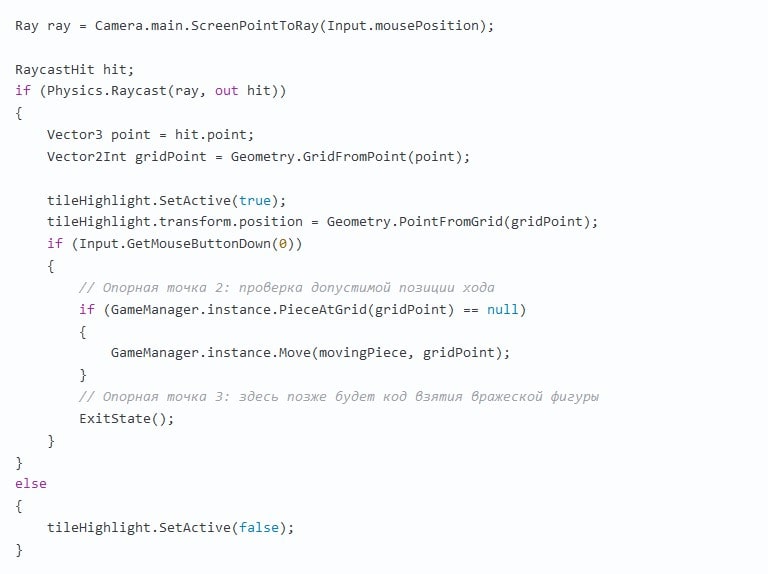
In this case Update is similar to the method from TileSelector and uses the same Raycast check to know which square the mouse is over. This time, however, we call the GameManager to move the shape to the new square when the mouse button is pressed.
Finally, we add an ExitState method to reset everything and prepare for the next move:
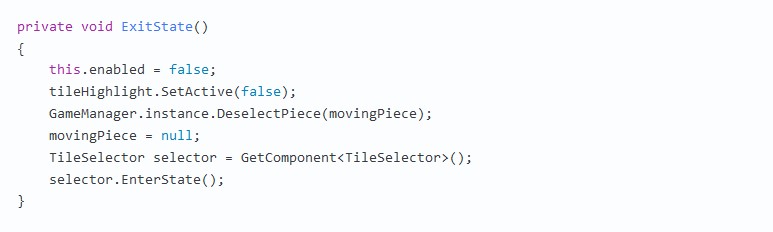
We disable this component and hide the cell selection overlay. Since the shape is moved, we can clear this value and ask the GameManager to deselect the shape. Then we call EnterState from the TileSelector to start the process from the beginning.
Select the Board in the editor and drag the cell overlay prefabs from the prefab folder to the MoveSelector slots:
- Move Location Prefab should be Selection-Blue
- Tile Highlight Prefab should be Selection-Yellow.
- Attack Location Prefab must be Selection-Red.
Colors can be changed using the material settings.
Start Play mode and try to move the shapes.
You will notice that you can move pieces to any empty square. That would be a very strange game of chess! In the next step we will make the pieces move according to the rules of the game.
Define the legal moves.
In chess each piece has its own legal moves. Some pieces can move in any direction, some can move a certain number of cells, and some can only move in one direction. So how do we keep track of all these choices?
One way is to create an abstract base class that describes all the shapes, then create separate subclasses that override the method of generating cells for the move.
We need to answer another question: where should we generate the list of moves?
It would make sense to generate them in the EnterState of the MoveSelector component. Here we generate overlay squares that show where a player can move, so this makes the most sense.
Generating a list of allowed cells
The general strategy is to take the chosen piece and ask the GameManager for a list of allowable squares (i.e., moves). The GameManager will use a subclass of the shape to generate a list of possible squares. It will then filter out occupied or off-board positions.
This filtered list is sent back to the MoveSelector, which highlights the possible moves and waits for the player’s choice.
The simplest move is the pawn, so it makes sense to start with it.
Open Pawn.cs in Pieces, and change the MoveLocations to look like this:
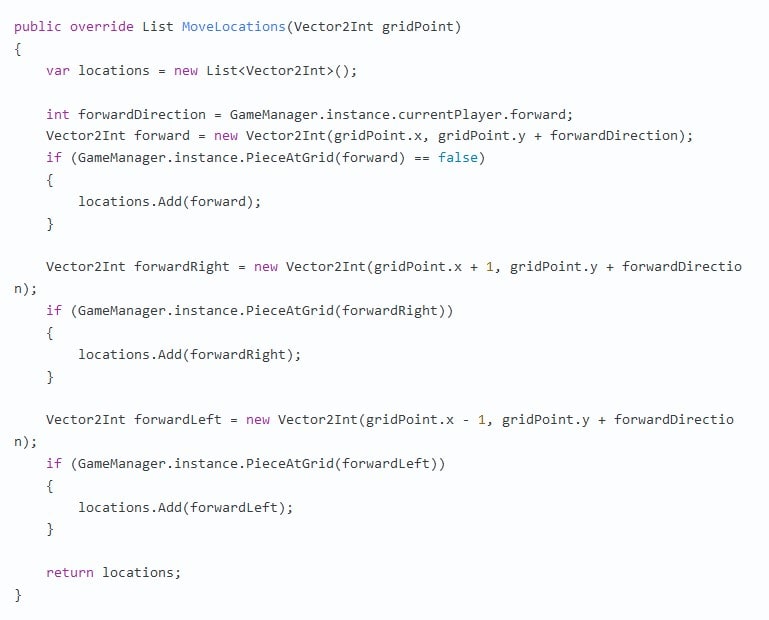
Here we perform several actions:
First, this code creates an empty list for recording positions. Then it creates a position that represents a cell one step forward.
Since white and black pawns move in different directions, the Player object contains a value that determines the direction of the pawn’s movement. For the first player this value is +1, for the opponent it is -1.
Pawns move in a special way and have some special rules. Although they can move forward one square, they cannot take an enemy piece on that square; they only take pieces diagonally forward. Before adding the front square as a valid position, we must check if another piece occupies that space. If not, we can add the front square to the list.
In the case of takedown squares we must also check if there is a piece in that position. If there is, we can take it.
For now, we won’t check if it belongs to the player or his opponent, but we’ll do that later.
In the GameManager.cs script, add this method right after the Move method:
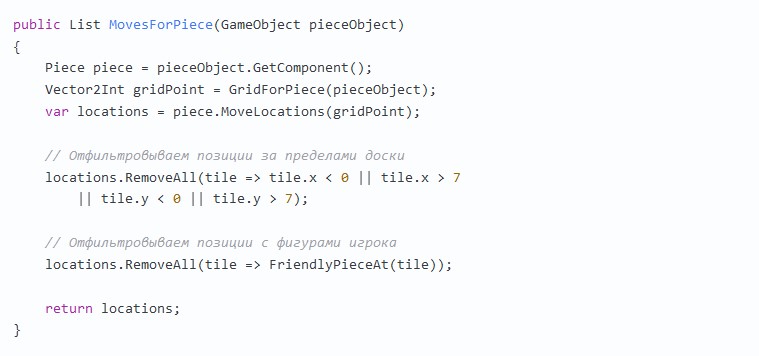
Here we get the Piece component of the game piece and its current position.
Then we query the GameManager for a list of positions for that shape and filter out invalid values.
RemoveAll is a useful function that uses a callback expression. This method looks at every value in the list, passing it to the expression as a tile. If this expression is true, the value is removed from the list.
This first expression removes positions with x or y values that would place a piece outside the board. The second filter is similar, but removes all positions that have player pieces.
At the top of the MoveSelector.cs script class, add the following instance variables:

The first stores a list of GridPoint values for move positions; the second stores a list of overlay cells, indicating whether a player can move to that position.
Add the following lines to the end of the EnterState method:
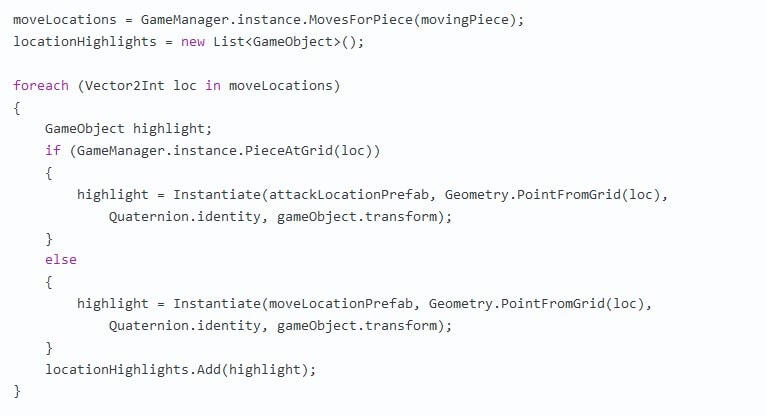
This part does several things:
First, it gets a list of valid positions from the GameManager and creates an empty list to store cell-overlay objects. Then it loops around each position in the list. If the current position already has a piece, it must be the opponent’s piece, because the player’s pieces are already filtered out.
Enemy positions are assigned an attack overlay, and other positions are assigned a move overlay.
Execute Move
Add this code under Reference point 2, inside the if construct that checks the mouse button:

If the player clicks on a square that is not a valid move, the function exits.
Finally, add code to MoveSelector.cs at the end of ExitState:

At this point the player has chosen a move, so we can remove all overlay objects.
Wow! We had to write a lot of code just to get the pawn to move. Once we finish all the hard work, it will be easier for us to learn how to move other pieces.
Next player.
If only one side can move, it doesn’t look like much of a game. As long as we get that fixed!
In order for both players to play, we need to decide how to switch between players and where to add code.
Since the GameManager is responsible for all the rules of the game, it makes sense to put the switch code in it.
The switch itself is pretty easy to implement. The GameManager has variables for the current player and the other player, so we just need to swap these values.
The tricky part is where do we call the switch?
A player’s move ends when he finishes moving a piece. The ExitState in MoveSelector is called after moving the selected piece, so it seems best to perform the switch here.
Let’s add the following method to the end of the GameManager.cs script class:
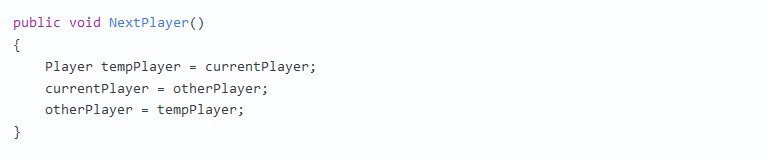
To swap two values, we need a third variable used as an intermediary; otherwise, we overwrite one of the values before it is copied.
Let’s go to MoveSelector.cs and add the following code to ExitState, just before calling EnterState:

That’s it! ExitState and EnterState will take care of their own cleanup.
Start Play mode and you’ll see that the pieces are now moving on both sides. We’re already getting closer to the real game.
Taking pieces
Taking pieces is an important part of chess. Since all the rules of the game are in the GameManager, open it and add the following method:
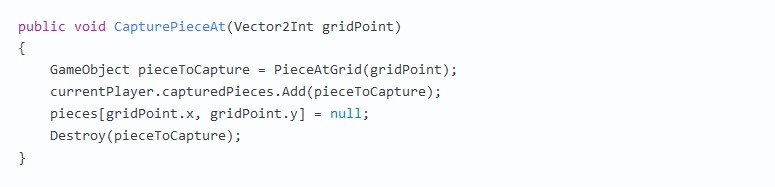
Here the GameManager checks which piece is in the target position. This piece is added to the list of taken pieces for the current player. It is then removed from the GameManager’s record of board cells and the GameObject is destroyed, which removes it from the scene.
In order to take a piece, you have to stand on top of it. Therefore, the code to call this action should be in MoveSelector.cs.
In the Update method, find the Reference Point 3 comment and replace it with the following construction:

The previous if construction checked if there is a piece in the target position. Since the player’s pieces were filtered out during the move generation phase, there must be an enemy piece on the square containing the piece.
After removing an enemy piece the selected piece can make a move.
Press Play and move the pawns until you can take one of them.
I am a queen, you took my pawn – prepare to die!
Ending the game
A chess game ends when a player takes the opponent’s king. When a piece is taken, we check to see if it is the king. If it is, the game is over.
But how do we stop the game? One way is to remove the TileSelector and MoveSelector scripts from the board.
In the CapturePieceAt method of the GameManager.cs script, add the following lines before removing a taken piece:
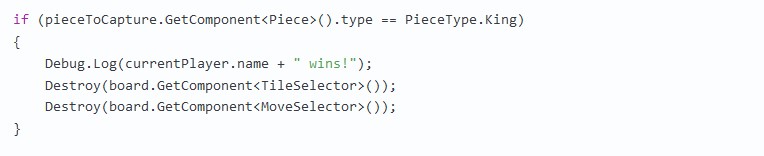
Disabling these components will not be enough. The following ExitState and EnterState calls will turn one of them on, so the game will continue.
Destroy doesn’t apply only to GameObject classes; you can use it to remove a component attached to an object as well.
Click Play. Move your pawn and take your opponent’s king. You’ll see a victory message pop up in the Unity console.
As an optional task, you can add UI elements to display a “Game Over” message or jump to the menu screen.
Now it’s time to pull out the serious weapons and set the stronger pieces in motion!
Special moves.
Piece and its individual subclasses are a great tool for encapsulating special move rules.
You can use techniques from Pawn to add moves to some other pieces. Pieces that move one square in different directions, such as a king and a knight, are set up in a similar way. Try implementing these move rules yourself.
Take a look at the finished project code if you need a hint.
Multiple Cell Strokes
A more complex case are pieces that can move several squares in the same direction, namely bishop, rook and queen. The bishop is easier to show, so let’s start with him.
Piece has pre-prepared lists of directions in which the bishop and rook can move from the starting point. These are all directions from the current position of the piece.
Open Bishop.cs and replace MoveLocations with the following code:
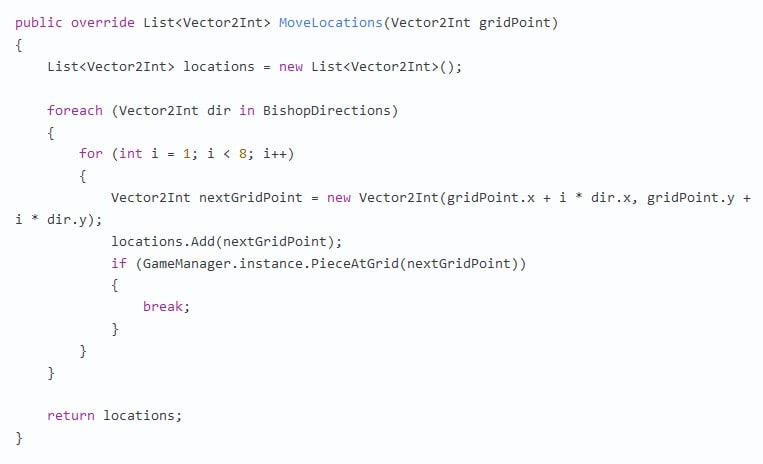
The foreach loop traverses each direction. For each direction, there is a second loop that generates enough new positions to move the piece off the board. Since the list of positions will filter out the off-board positions, we just need as many as we need to make sure we don’t miss any cells.
At each step, we will generate a GridPoint for the position and add it to the list. Then we check if there is a shape in that position. If there is, we stop the inner loop to go in the next direction.
The break is added because a standing figure will block further movement. Again, down the chain we will remove positions with player pieces, so we won’t be bothered by their presence anymore.
Note: if you need to distinguish direction forward from direction backward, or left from right, you should keep in mind that black and white pieces move in opposite directions.
In chess, this is only important for pawns, but other games this distinction may be necessary.
That’s it! Start Play mode and try to play.
Moving the Queen
The queen is the strongest piece, so it is best to end up with it.
The queen’s move is a combination of the bishop’s and rook’s moves; the base class contains an array of directions for each piece. It will be useful if you can combine these two pieces.
In Queen.cs, replace MoveLocations with the following code:
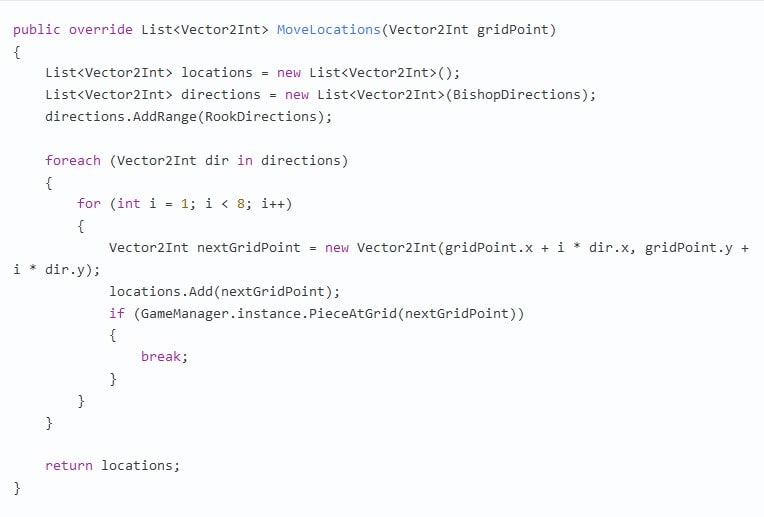
The only thing that is different here is turning an array of directions into a List.
The advantage of List is that we can add directions from another array, creating one List with all the directions. Otherwise, the method is the same as in the Elephant code.
Click on Play again and remove the pawns from the path to make sure everything works correctly.
Where do we go next?
There are a few things we can do at this point, such as finishing up the king, knight, and rook moves. If you run into problems at any stage, check out the finished project in the project materials.
There are special rules that we haven’t implemented here, such as the first pawn move to two squares instead of one, castling, and some others.
The general pattern is to add variables and methods to the GameManager that keep track of these situations and their possibility when you move a piece. If they are possible, you need to add the appropriate positions for that figure to MoveLocations.
You can also make visual improvements to the game. For example, pieces can move to a new position smoothly, and the camera can rotate to show the board from the second player’s point of view in his turn.